Cisco IOS Certificate Server set-up and client enrolment (GNS3 Lab)


A quick step by step overview of how to configure the certificate server on a Cisco IOS device.
The certificate server functionality was added in version 12.3(4). It is only available in in security images or higher. We can use this functionality to provide scalable authentication for VPN set-ups.
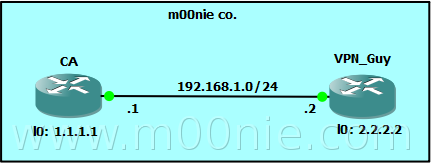
These are the seven basic steps that are needed to configure a fictional root certificate server on the CA IOS device shown in the topology below. If you would like to try yourself the initial GNS3 net file is [here] which includes all the basic config. The lab was made using 3600 routers running Version 12.4(16a) of IOS.
Certificate Server
| Step | Description |
| 1 | RSA key pair |
| 2 | PKI Trustpoint |
| 3 | Certificate Server |
| 4 | Issuing Policy |
| 5 | CRL |
| 6 | SCEP |
| 7 | Enable the Certificate server |
1. RSA Key Pair
First step is to generate a private/public key pair on the CA router. The private key will be used to sign "user" certificates and the public key will distributed and used to verify certificates. In the example below our keys are labelled CE-Key.
CA#conf t
Enter configuration commands, one per line.  End with CNTL/Z.
CA(config)#crypto key generate rsa usage-keys label CA-Key modulus 2048 exportable
The name for the keys will be: CA-Key

% The key modulus size is 2048 bits
% Generating 2048 bit RSA keys, keys will be exportable...[OK]
% Generating 2048 bit RSA keys, keys will be exportable...[OK]
2. PKI Trustpoint
The trustpoint configures what key pair will be used within the certificate server.
CA(config)#crypto pki trustpoint CA-Server
CA(ca-trustpoint)#rsakeypair CA-key
3. Certificate Server
Now we create and configure the actual certificate server. We configure it using the same name as the trustpoint from step 2. Then we configure a local location for the database (this can be remote) and set the database storage level to complete. Finally we configure the X.500 name information using the X.500 distinguished name (DN) format.
CA#conf t
Enter configuration commands, one per line.  End with CNTL/Z.
CA(config)#crypto pki server CA-Server
CA(cs-server)#database url flash:/CA-Server
CA(cs-server)#database level ?
  complete  Each issued certificate is saved to the database
  minimum   Minimum certificate info is saved to the database
  names     Certificate serial-number & subject name is saved to the database

CA(cs-server)#database level complete
CA(cs-server)#issuer-name C=UK,L=m00nietown,O=m00nieCo,OU=x.509 certs,CN=m00nie.com VPN
4. Issuing Policy
We can either manually grant all certificate requests or automatically grant all requests. We will configure a password to provide some additional authentication when users try to enroll. First we configure sha-1 as the hash algorithm used to sign the certificates with (MD5 is the default). We configure the lifetime of the certificate servers signing certificate (5 years) when this expires all issued certificates are invalidated and users will have to re-enroll. Now we configure the lifetime of client issued certificates after which clients will have to re-enroll. Both lifetimes are counted in days.
CA#conf t
Enter configuration commands, one per line.  End with CNTL/Z.
CA(config)#crypto pki server CA-Server
CA(cs-server)#hash sha1
CA(cs-server)#lifetime ca-certificate 1825
CA(cs-server)#lifetime certificate 730
CA(cs-server)#no grant auto
5. CRL
Now we define the revocation policy used to create and maintain the Certificate Revocation List (CRL). In this example we configure the CRL to only be valid for an hour (the minimum) and publish the CRL on the router itself using the cdp-url http://MYROUTERIP/cgi-bin/pkiclient.exe?operation=GetCRL command. Note -to enter the "?" you may need to press "Ctrl+V" before entering it!!
CA#conf t
Enter configuration commands, one per line.  End with CNTL/Z.
CA(config)#crypto pki server CA-Server
CA(cs-server)#lifetime crl 1
CA(cs-server)# !!!!!!!!!!! < YOU MAY NEED Ctrl+V before entering the ? >
CA(cs-server)#cdp-url http://1.1.1.1/cgi-bin/pkiclient.exe?operation=GetCRL
6. SCEP
To ease admin burden and provide scalability we "configure" the use of Simple Certificate Enrollment Protocol (SCEP). This is done by enabling the IOS HTTP server.
CA#conf t
Enter configuration commands, one per line.  End with CNTL/Z.
CA(config)#ip http server
7. Enable Certificate server
Finally we enable the certificate server now that all the prerequisites have been configured :) First we must ensure that the time of the Certificate Server is correct! In this example we configure the CA router as a NTP master then enable the server. Well configured and synchronized time on all devices is very important in a PKI environment!!
CA(config)#clock timezone GMT 0 0
CA(config)#ntp master
CA(config)#crypto pki server CA-Server
CA(cs-server)#no shutdown
%Some server settings cannot be changed after CA certificate generation.
% Please enter a passphrase to protect the private key
% or type Return to exit
Password:
% Password must be more than 7 characters. Try again
% or type Return to exit
Password:

Re-enter password:

%Some server settings cannot be changed after CA certificate generation.
% Exporting Certificate Server signing certificate and keys...

% Certificate Server enabled.
Now the Certificate server is configured and running :) We can validate this with the show crypto pki server command.
CA#show crypto pki server
Certificate Server CA-Server:
    Status: enabled
    Server's configuration is locked  (enter "shut" to unlock it)
    Issuer name: C=UK,L=m00nietown,O=m00nieCo,OU=x.509 certs,CN=m00nie.com VPN
    CA cert fingerprint: 042C977E 813C0A67 87D794DF C16B10C2
    Granting mode is: manual
    Last certificate issued serial number: 0x1
    CA certificate expiration timer: 02:27:25 GMT Feb 28 2007
    CRL NextUpdate timer: 03:27:25 GMT Mar 1 2002
    Current storage dir: flash:/CA-Server
    Database Level: Complete - all issued certs written as <serialnum>.cer
CA#
Just to note that any further changes will require the certificate server to be shutdown.
Client Enrolment
| Step | Description |
| 1 | RSA key pair |
| 2 | PKI Trustpoint / SCEP |
| 3 | CA certificate installation |
| 4 | Erollment Request |
1. RSA key pair<
Much the same as on the CA router generate a public/private key pair.
VPN_Guy#conf t
Enter configuration commands, one per line.  End with CNTL/Z.
VPN_Guy(config)#crypto key generate rsa general-keys label VPN-Key modulus 2048 exportable
The name for the keys will be: VPN-Key

% The key modulus size is 2048 bits
% Generating 2048 bit RSA keys, keys will be exportable...[OK]

*Mar  1 04:34:57.814: %SSH-5-ENABLED: SSH 1.99 has been enabled
2. PKI Trustpoint / SCEP
Now we need to configure the trustpoint to tell the client how we would like it to enroll. Its worth defining the source IP for this enrollment to avoid issues (See comments below and thanks for Joshua for pointing out :))
VPN_Guy(config)#crypto pki trustpoint CA-Server
VPN_Guy(ca-trustpoint)#source interface Loopback0
VPN_Guy(ca-trustpoint)#enrollment url http://1.1.1.1
VPN_Guy(ca-trustpoint)#revocation-check crl
VPN_Guy(ca-trustpoint)#fqdn VPN_Guy.m00nie.com
VPN_Guy(ca-trustpoint)#subject-name CN=VPN_Guy,OU=X.509,O=m00nieCo,C=UK
VPN_Guy(ca-trustpoint)#rsakeypair VPN-Key
3. CA certificate
Now we need to install the CA server certificate (and verify it).
VPN_Guy(config)#crypto pki authenticate CA-Server
Certificate has the following attributes:
       Fingerprint MD5: 042C977E 813C0A67 87D794DF C16B10C2
      Fingerprint SHA1: 8B182326 5FD01A2A 67572725 D3667D64 73FE9D30

% Do you accept this certificate? [yes/no]: yes
Trustpoint CA certificate accepted.
verify the fingerprint against the output of show crypto pki server on the Certificate server.
CA#show crypto pki server
 ..
    CA cert fingerprint: 042C977E 813C0A67 87D794DF C16B10C2
 ..
4. Enrolment request
Now we simple enroll with the certificate server.
VPN_Guy(config)#crypto pki enroll CA-Server
Then on the CA router
CA#crypto pki server CA-Server info requests
Enrollment Request Database:

Subordinate CA certificate requests:
ReqID  State      Fingerprint                      SubjectName
--------------------------------------------------------------

RA certificate requests:
ReqID  State      Fingerprint                      SubjectName
--------------------------------------------------------------

Router certificates requests:
ReqID  State      Fingerprint                      SubjectName
--------------------------------------------------------------
1      granted    BE142DCED9C067269D1F4E740C34B77F hostname=VPN_Guy.m00nie.com,cn=VPN_Guy,ou=X.509,o=m00nieCo,c=UK
And grant the request like with the command crypto pki server CA-Server grant 1.
Now we can confirm that the VPN_Guy router has the signed certificate returned from the Certificate server
VPN_Guy#show crypt pk certificates
Certificate
  Status: Available
  Certificate Serial Number: 02
  Certificate Usage: General Purpose
  Issuer:
    c=UK
    l=m00nietown
    o=m00nieCo
    ou=x.509 certs
    cn=m00nie.com VPN
  Subject:
    Name: VPN_Guy.m00nie.com
    hostname=VPN_Guy.m00nie.com
    cn=VPN_Guy
    ou=X.509
    o=m00nieCo
    c=UK
  CRL Distribution Points:
    http://1.1.1.1/cgi-bin/pkiclient.exeoperation=GetCRL
  Validity Date:
    start date: 00:19:30 UTC Mar 1 2002
    end   date: 00:19:30 UTC Feb 29 2004
  Associated Trustpoints: CA-Server

CA Certificate
  Status: Available
  Certificate Serial Number: 01
  Certificate Usage: Signature
  Issuer:
    c=UK
    l=m00nietown
    o=m00nieCo
    ou=x.509 certs
    cn=m00nie.com VPN
  Subject:
    c=UK
    l=m00nietown
    o=m00nieCo
    ou=x.509 certs
    cn=m00nie.com VPN
  Validity Date:
    start date: 00:05:27 UTC Mar 1 2002
    end   date: 00:05:27 UTC Feb 28 2007
  Associated Trustpoints: CA-Server
Now we have a signed certificate from our own CA installed and ready to use!
m00nie :D